
As a quick recap for anyone who hasn’t be following, I started out 2020 stating that I would do twelve, one-month challenges. January’s challenge was to resurrect this blog and write a post every day. February’s challenge was to dust off my Sony a6000 camera and take a photo every day, while working to establish systems for editing and organization. And in March, I aimed to improve my drawing skills.
Self Portraits
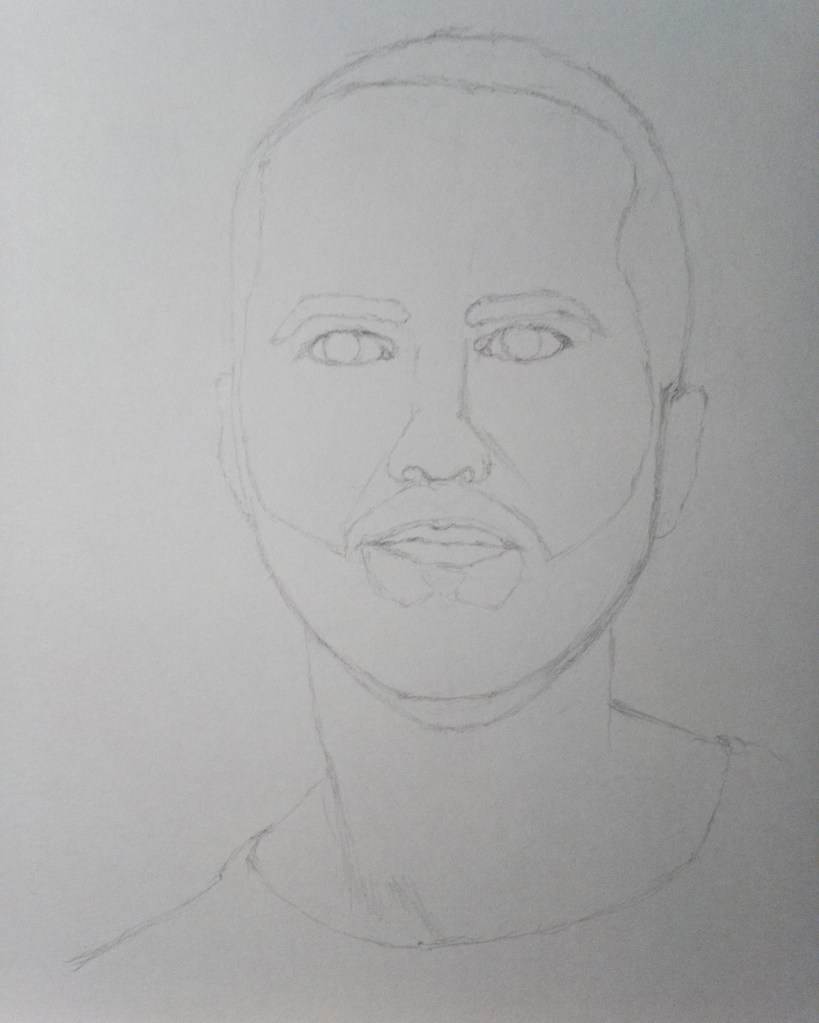
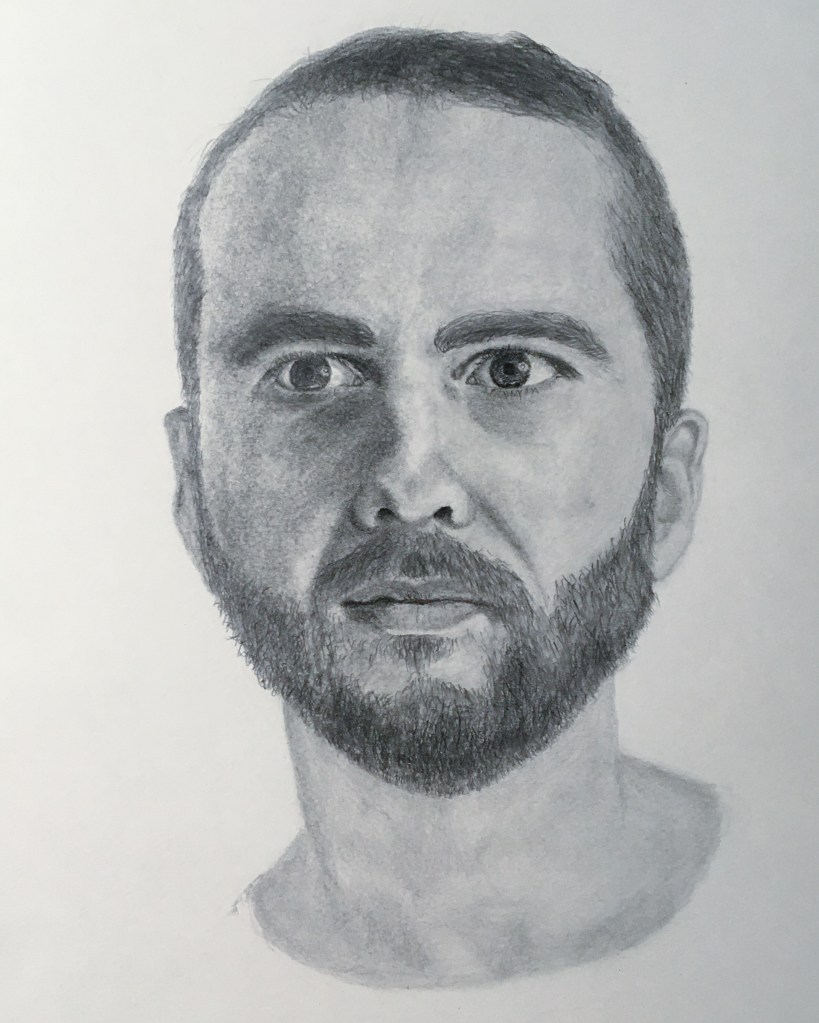
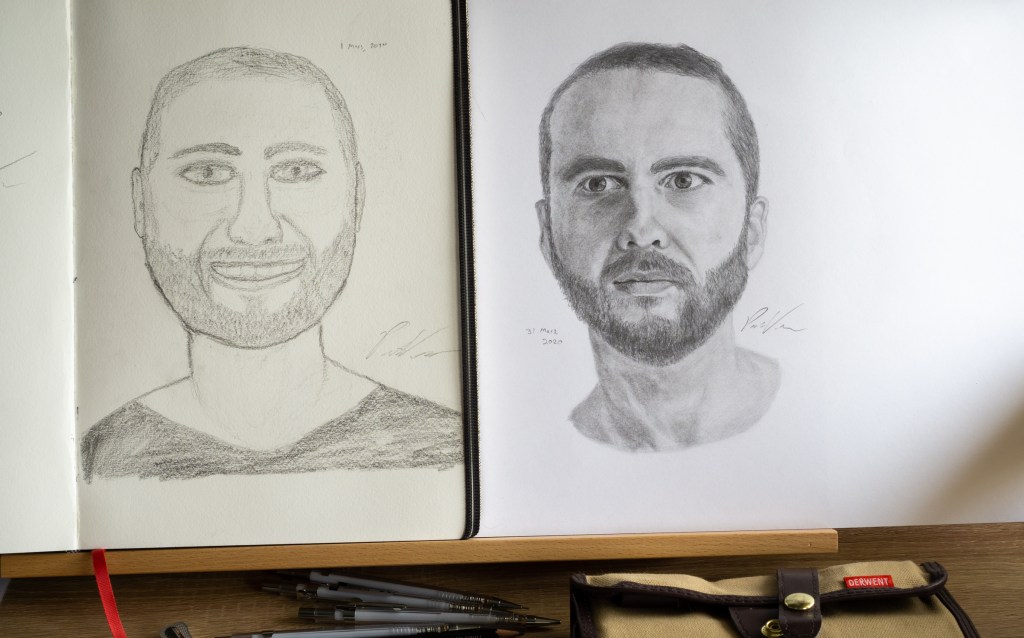
When I began the challenge, originally I had thought to keep a streak going and draw something every day. However, I had previously seen Max Deutsch’s blog post where he aimed to learn to draw a realistic self-portrait in one month, and I thought it would be interesting to have a beginning and end of month attempt to measure my progress. (It wasn’t until I was already into the month that I learned that blogger Scott Young had done a similar challenge, also in 2016.) So on the first day, I took a little less than an hour and drew this:

Not the worst drawing that I had ever done, but clearly it had a lot of room for improvement.
Over the course of the month, I wrote about my adventure where I broke down the portrait drawing process into drawing head shapes, individual facial elements, and different celebrity photos as part of my practice routine.
Today, before going through my final self portrait, I wanted to summarize the things that I found most useful. Like an Alton Brown recipe, I’ll break it down into Hardware (physical drawing tools) and Software (online tutorials and practice techniques):
The Hardware
- Hahnemühle A3 100g sketch paper: I did some of my on-the-go sketches in a smaller A4 notebook, but this is the paper I used for my portraits at the end.
- Derwent Graphic Pencils: I was actually fortunate enough to go to the Derwent Pencil Museum in Keswick, England when I was in the area last fall. I bought the full 24 pencil set while I was there, but for these drawings I only ended up using four pencils: HB, 3B, 5B, and 7B. (Medium to soft graphite pencils, where softness is how easy it is to make dark marks on the page.)
- MozArt Mechanical Pencils: These were useful for hair and beards as I could make the same width marks over and over without needing to continually stop to resharpen the pencil.
- Faber-Castell Kneaded Erasers: I started with a normal Derwent artist eraser, but the kneaded erasers ended up being a game changer. Not only can you easily shape it to remove graphite from a particular area, but you can dab the surface to lighten or even add highlights and white or gray hairs.
- Blending Stumps and Tortillons: I had never used these prior to this month, but I swear they are magic. Having lots of them helps as you will want to different sizes depending on the application and separate ones for dark and light areas.
- Cheap Pencil Sharpener: Important for resharpening pencils, but no need for anything fancy.
- A3 Wooden Drawing Board: When drawing a subject, it is vital to have both the subject (in this case the computer screen) and the drawing surface perpendicular to your gaze. This board allows you to position the paper facing toward you, instead of at an angle if it were on a flat tabletop.
There are lots of other gadgets that one can get into, but these are what I ended up using at the end.
The Software
- Start by just drawing head outlines from lots of different angles. The Loomis Method is useful for learning how to draw the basic skull and jaw lines, as well as the horizontal lines for the brow, nose, lips, and hairline.
- Then spend some time drawing simple faces. One thing that I have learned is that it takes me a long time to get the position and proportion of the different facial features correct. For my better drawings, this means spending literally hours just outlining the jaw, eyes, nose, lips, etc., without any details. Sketch, erase, tweak, retweak, etc, until the basic outlines look right. If you try to add detail too early, you will either end up with a subpar drawing or will need to erase all of the details later, wasting time and potentially messing up the paper.
- Once you are content with the outline, then add in the details. I learned almost everything about these features and shading from the RapidFireArt YouTube channel. I’d specifically recommend her tutorials to draw the eyes, nose, lips, ears, and hair.
I would say that those three elements made up over 80% of my learning over the course of the month.
But, of course, the real challenge was to see if I could use what I had learned to improve my self portrait.
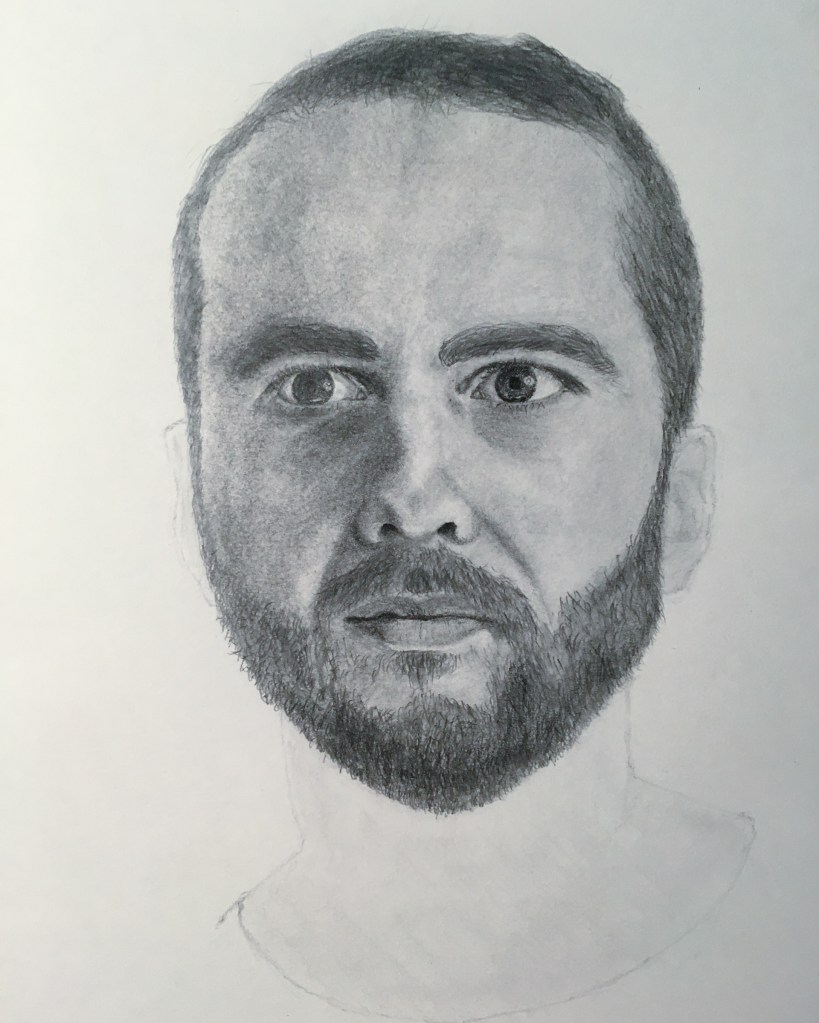
End-of-Month Self Portrait
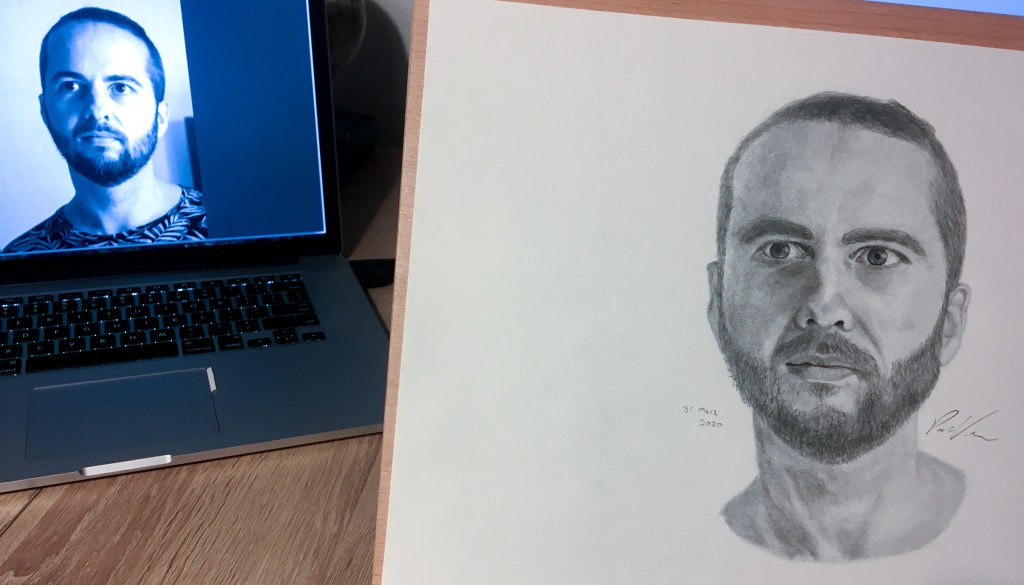
First thing was to choose a photo. I wanted something more interesting than the old, zoomed-in, Instagram photo I had used for the first portrait. So using some of my practice from the February challenge, I set up my tripod and took a couple new pictures.
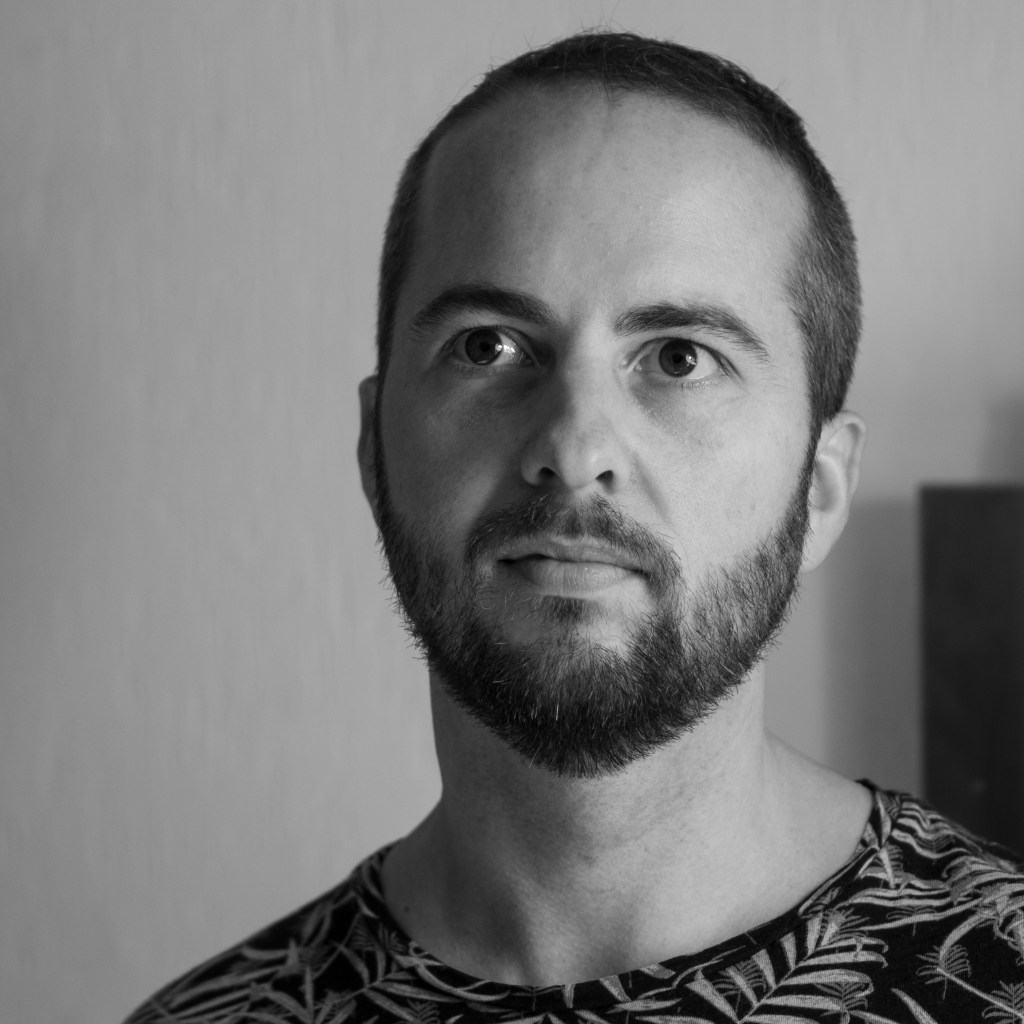
I ended up liking this one as it provided nice contrast for shading and had a slight angle to add an extra challenge.
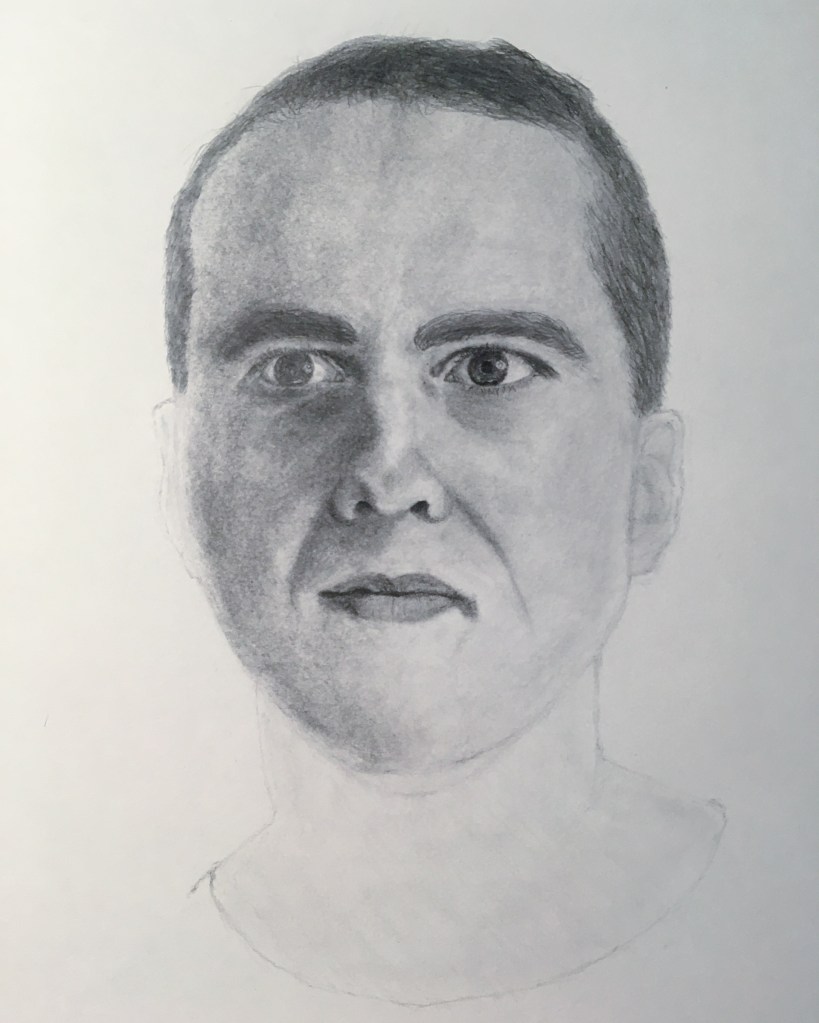
The first day, I spent a little over an hour just working on the outlines.
I was satisfied with how it was looking at this point, but I knew it wasn’t perfect. So on the second day, I reminded myself of the rule I stated before: make sure that the outlines are what you ultimately want before adding any details. The difference between the Day 1 and Day 2 photos is a little over two hours of work. Unless you look back and forth in detail, or scrutinize them against the reference photo, they don’t look very different. But I’m 100% convinced that if I didn’t spend the extra time getting the outlines right, I wouldn’t have been happy with the final output.

Once more for the people in the back: getting to this point was 80% of the hard work. That isn’t to say 80% of the time that I spent. As we go through the steps of the final day, you’ll see I spent over eight hours on the last day to finish the drawing. But I had previously demonstrated to myself that I could convincingly add detail and shading. What my previous drawings had lacked was accuracy.
Final Day
I started by applying a light value (drawing term for unified swath of some variety of gray) across the face. Then I added detail in the eyes, nose, and mouth.

Once I got over the image of staring into my face post chemotherapy, I made sure to properly place the eyebrows and then used the 0.5 mm mechanical pencil to fill in the hair.
Having had a beard for essentially all of the last ten years, it was an interesting exercise to see what I would look like nowadays if I were to shave.
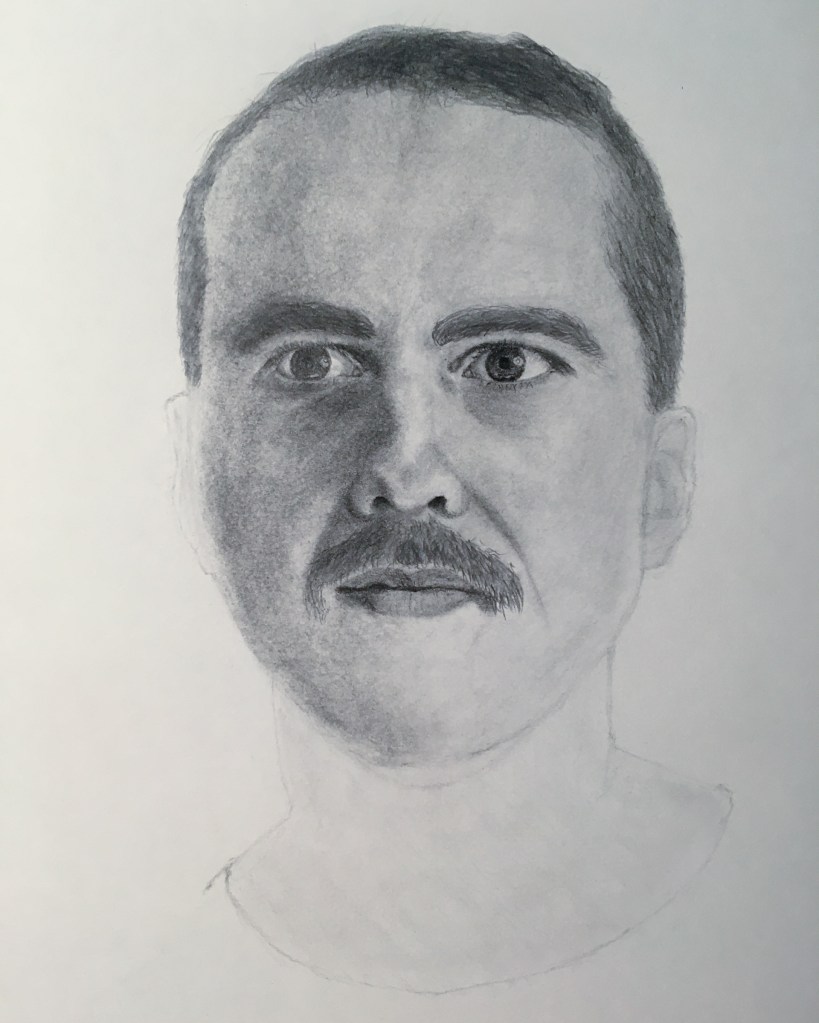
Or even to go for a ’70s/hipster mustache look.
A brief note: take frequent breaks when adding all of the hair and beard to stretch out your wrist as it is a lot of small marks.
Finally, I added detail to the ears and necks and voilà! My second attempt at a self portrait was complete.

To say that I am proud of how it turned out is an understatement. Even as I write this I will occasionally glance over at my sketch and not believe that it is something that I was capable of producing.
And when I compare it to the first day, the difference is truly staggering.
One caveat:
- This is not a true experiment in that I didn’t use the same photo, same supplies, and same time frame for the second drawing as the first. I spent about 15-20x as long on the second drawing (12+ hours vs. 40-45 min.). But I also don’t think that I could have done much better if I had given myself lots of time for the first drawing. The goal was not to see how I could do in the same environment, but rather just to put forth my best effort each time.
This was a similar approach taken by Max Deutsch and Scott Young in their challenges as well. I actually reached out to them on Twitter when I finished, and was surprised and flattered to get a congratulations from Scott. It was extra cool because I was also in the process of finishing his book, Ultralearning, in which he writes about his different rapid-learning challenges (such as the self-portrait) as well as those from numerous other people.
I have felt personally fulfilled at the end of each month looking back on my progress, but this time was something special. The challenge also developed a different dimension as the last half of the month was spent in COVID-19 quarantine, where continuing to draw each day provided a sense of calm and normalcy. While the world has obviously dramatically changed since I began my 2020 Challenges, I still plan on taking on something every month, even if the projects get shifted around based on whether or not a need a signed form to walk out the front door.
Thanks to everyone for reading, and I would love to know if you have any additional questions or if you decide to take on a drawing challenge of your own.
In the meantime, I’ve decided to take inspiration from the See 10, Do 10 Instagram push-up challenge that cropped up at the end of March and to make April the #See10Do10000 month. In other words:
In April 2020, I will do 10,000 pushups.
I wanted to have something less creatively demanding so I could take some time to reflect and integrate some of the things I’ve learned thus far this year. Plus, since it doesn’t look like I’ll be going anywhere all month, it is relatively easy to drop to the floor and do 25 pushups at regular intervals throughout the day.

C’est incroyable d’imaginer qu’en s’exerçant 1 heure par jour pendant un mois on peut arriver à un résultat aussi spectaculaire !
Très inspirant 🙂
LikeLiked by 2 people
Pingback: How to Finish a Painting – Chortles and Harrumphs
Pingback: How to Solve the New York Times Crossword Puzzle ✏️ – Chortles and Harrumphs